Layered Snowflake Ornaments
These Snowflake Ornaments are some of my favorite winter projects because they’re endlessly customizable. This design can be layered in different ways, giving you room to play with color, texture, and dimension.
You can keep things clean and classic with bright white cardstock… or go bold with holographic foils, pearlescent papers, cozy kraft tones, or even soft pastel palettes. Add vellum behind the cutouts to catch the light, build shaker ornaments filled with sequins or glitter, or stack layers for a dimensional tag that turns any gift into a tiny piece of art.
There’s no “right” way to assemble these — just your creative vision.
Feel free to mix and match layers, resize the designs, try new materials, and experiment with what inspires you. Every combination creates something completely unique, and I hope you have as much fun making them as I did designing them.
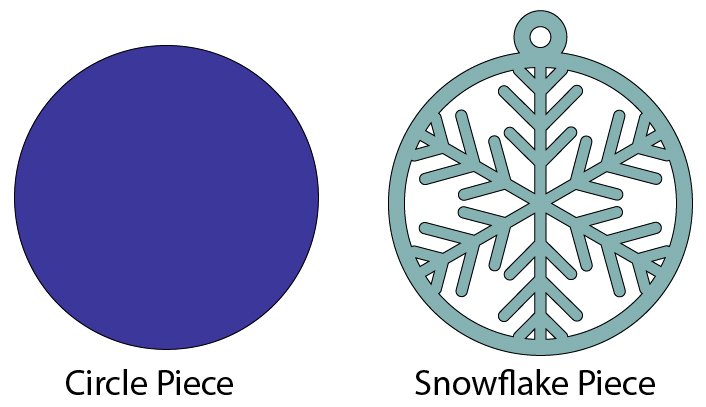
Below, you’ll find step-by-step instructions and project ideas to get you started. Each snowflake has two parts - a circle piece and a snowflake piece. You’ll cut different numbers of each piece out of different materials depending on what you are making. The finished project at the size in the cut file is about 4.25 x 4.75 inches. You can scale the design to fit your needs but be mindful of how small some of the holes get if you scale the design down too much.
Light Catching Ornament with Vellum
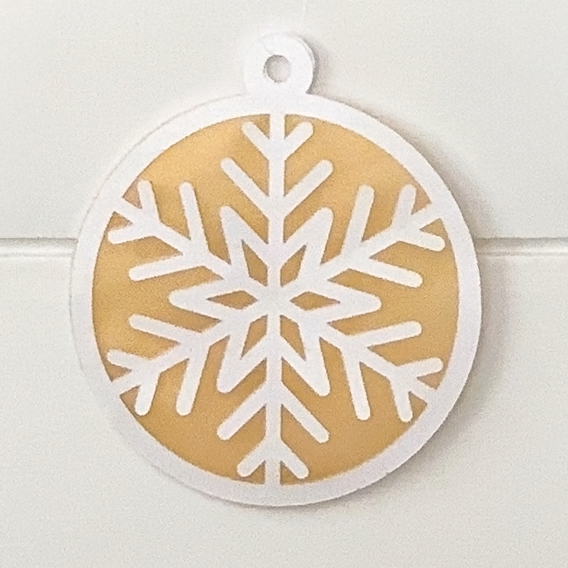
White cardstock with gold shimmer vellum.
Hang this on your tree, in your window or use as a gift topper.
Supplies
Cardstock
Vellum
String / yarn
Scissors
Glue or double-sided tape
Assembly
Cut two snowflake pieces out of cardstock.
Cut one circle piece out of vellum.
Glue the vellum to the back of one snowflake piece.
Glue the other snowflake piece on the other side of the vellum to make a little sandwich.
Cut a piece of string or yarn and thread it through both the front and back holes on the snowflake pieces. Tie a knot to make a loop.
Layered Gift Tag
Make this elegant and simple gift tag using the sketch feature on your machine to get a beautifully polished look. At the default size, these are large enough that you can fit a short message beyond the standard To/From depending on the font and size you choose for the sketch design.
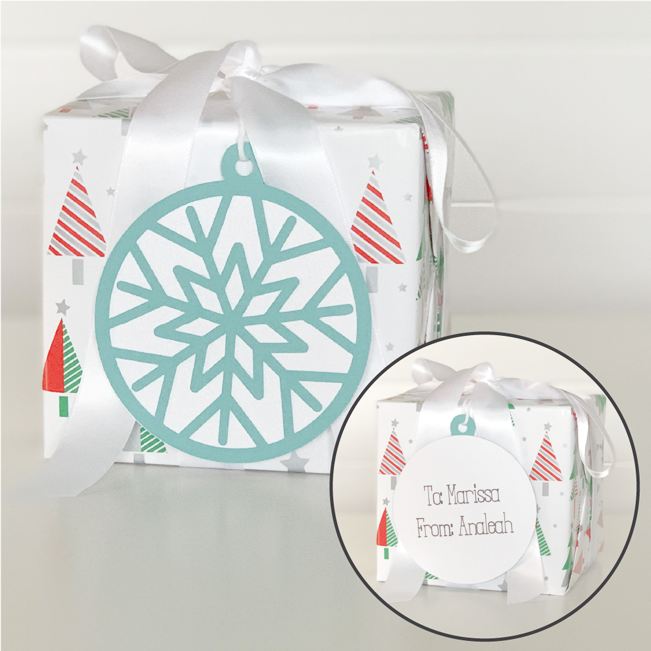
Light blue snowflake with white circle to make a cute gift tag.
Supplies
Color cardstock
White smooth cardstock (for the back of the gift tag)
String / yarn
Scissors
Glue or double-sided tape
Assembly
Cut one snowflake piece out of the color cardstock.
Cut one circle piece out of white smooth cardstock.
Tip: If you are using the sketch feature on your machine to address the gift tag, perform the sketch action first and then the cut action. This will help keep the circle piece secure during the sketching action.Glue the circle piece on the back of the snowflake piece.
Cut a piece of string or yarn and thread it through both hole on the snowflake piece. Tie a knot to make a loop.
Snowflake Shaker Gift Topper or Tag
Make a festive and interactive shaker to use as a gift topper or tag.

White snowflake shaker gift tag with white background.
Supplies
Color cardstock
White smooth cardstock (if making a gift tag)
Acetate
Shaker filler - glitter, small beads, sequins, etc.
String / yarn
Scissors
Glue or double-sided tape
Double-sided foam tape
Assembly
Cut one snowflake piece out of cardstock.
Cut one circle piece. If you are making a gift tag do this with white smooth cardstock so you have a good surface to write on. If you don’t plan to write on the back of the shaker, use any color, pattern or texture you like.
Tip: If you are using the sketch feature on your machine to address the gift tag, perform the sketch action first and then the cut action. This will help keep the circle piece secure during the sketching action.Cut one circle piece out of the acetate.
Glue the acetate circle piece on the back of the snowflake piece.
Add foam tape around the edge of the acetate to create a completely closed circle.
Tip: Don’t peel off the protective layer on the top side of the tape just yet! This will make sure you don’t get any filler stuck on the foam when filling.Fill the center of the foam circle with the shaker filler.
Carefully peel off the protective layer on the foam. Center the cardstock circle over the foam tape and press down really well.
Cut a piece of string or yarn and thread it through both hole on the snowflake piece. Tie a knot to make a loop.
Shake that beautiful shaker!